

01
Install & open
Open Jervis-Setup-0.1.0-x64.exe, choose your language and installation folder, then open Jervis Desktop from Start or your desktop.
 Jervis DESKTOP MCP
Windows preview
Jervis DESKTOP MCP
Windows preview
Windows + Linux · Arabic + English
Give your assistant the context it needs. Connect local projects to ChatGPT or Claude, work across folders, and decide what it can read or change.
Connection guideSHA-256 checksumWindows 10/11 · x64 · EXE installer · Preview
From download to first request
Open Jervis-Setup-0.1.0-x64.exe, choose your language and installation folder, then open Jervis Desktop from Start or your desktop.
Use an activated Jervis account to connect Jervis in ChatGPT or Claude. Generate a pairing code in the desktop app and paste its pairing request into your assistant.
Add folders, select Share project on each, and choose read-only or edit access independently.
Select Start sharing, then Copy prompt. Paste it into your assistant so it knows which projects to use.
One workspace. Multiple projects.
Share your frontend, backend, and docs together. Set each project to read only or allow edits when you need them.
“Compare the API with the frontend and explain what needs to change.”
Requested file content travels through the Jervis service to the AI provider you chose.
Frontend, backend and docs in one session, so your assistant can reason across them instead of one folder at a time.
Each folder carries its own access. Read only by default; allow edits only where you want them.
Unshare a project and keep the rest running. Closing the app ends sharing entirely.
Install the Jervis desktop companion on your PC, then connect it from your existing ChatGPT or Claude account. Both have been tested over remote MCP.
Permission model
Every project carries its own access level, and you can change it whenever you need.
If shared folders overlap, read-only access wins.
Where your files go
Clear permissions. Visible status.
Your assistant can access the projects you select. New folders start with read-only permissions.
Allow edits per project. Connector and account approvals still apply. For overlapping folders, read-only access wins.
Unshare one project and keep working with the others. Closing the app stops sharing. Keep it open or minimized while you work.
Files stay in their original folders. Requested content travels through the Jervis service to your chosen AI provider when a tool is used. This is not offline-only processing.
Clear boundaries
CHATGPT / CLAUDE
While the marketplace review is pending, you can add Jervis manually in ChatGPT if your account allows custom connections. Follow the steps below, then pair your computer. You need an activated Jervis account.
First time? Enable Developer mode using the guide below, then use the button to copy the URL and open ChatGPT. See the steps
Remote MCP URL
https://mcp.jervis.cloud/mcpAccess is currently by invitation. Contact the person who shared this link to activate your account.
Connection details
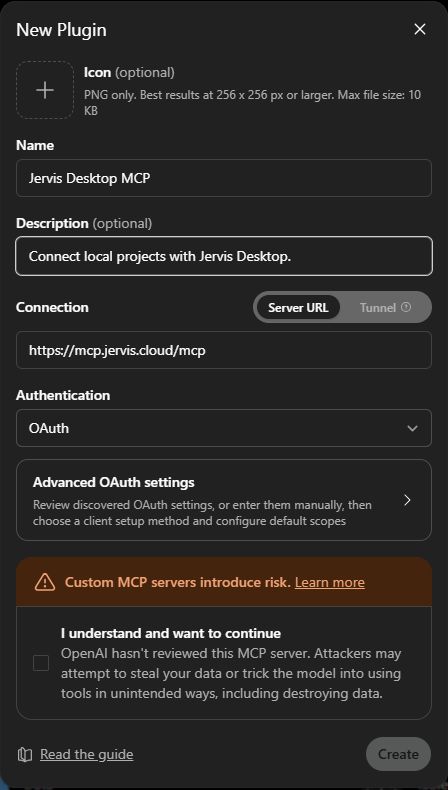
Missing Developer mode or the + button? Availability depends on your account and workspace policy. For a managed workspace, ask your administrator to allow custom connections. This adds a connection to your account; desktop access starts after pairing and running Jervis Desktop.
Add to ChatGPTCustom connectors are supported on Free, Pro and Max. On Team and Enterprise, an organization owner adds the connector first.
Add to ClaudeAfter connecting: open Jervis Desktop, generate a pairing code and send its request to your assistant. Choose your projects and permissions, then start sharing. Keep the app open while working. Your Jervis account must be activated by invitation.
Windows preview
Windows 10/11 · x64 · EXE installer · Preview · Download for Linux
This preview is not code-signed. Windows may display a publisher warning. Verify the download source and SHA-256 checksum; no security setting needs to be disabled.
AI connection requires an activated Jervis account. Downloading the app alone does not activate access.
Linux · x64
Choose the format for your distribution. After installation, connect ChatGPT using the same guide above.
DEB package — install with your package manager and open from your applications menu.
Download DEBSHA-256 · x64
From your Downloads folder, run:
sudo apt install ./Jervis-0.1.0-Linux-amd64.debA single file for compatible distributions. Allow it to run as a program, then open it.
Download AppImageSHA-256 · x64
chmod +x Jervis-0.1.0-Linux-x86_64.AppImage
./Jervis-0.1.0-Linux-x86_64.AppImage
AppImage needs FUSE 2, secret-tool and a Secret Service provider such as GNOME Keyring to save pairing. On Ubuntu/Debian, the DEB installs the credential-storage dependencies automatically.
Preview for 64-bit Intel/AMD computers. An activated Jervis account is required. Keep the app running while sharing.
Next: connect ChatGPT →Questions
Anyone can download the Windows preview. Connecting to an AI assistant currently requires an invitation, an activated Jervis account, and connector access. Contact the person who shared this page for activation.
ChatGPT and Claude connections have been tested. Other clients may work if they support compatible remote MCP and OAuth, but they have not all been verified. The app is not publicly listed in every app directory.
The desktop companion currently shares project files. Its project-sharing interface does not enable shell commands, screen control, or clipboard tools.
Windows x64 and Linux x64 downloads are available. For Linux, choose DEB for Ubuntu/Debian or AppImage for other compatible distributions. macOS downloads are not available yet.
This preview is not code-signed. Windows may display a publisher warning. Verify the download source and SHA-256 checksum; no security setting needs to be disabled.
Ready when you are
Start with read-only access. Share more when you are ready.
AI connection requires an activated Jervis account. Downloading the app alone does not activate access.